The nicest-looking AWI game I have ever played in

My most memorable American War of Independence wargame took place nearly 20 years ago at the Wellington Warlords’ (the wargaming club of New Zealand’s capital city) annual wargaming competition, ‘Call to Arms’.

At the 2002 event, one of the demo games at ‘Call to Arms’ was a refight of the Battle of Guilford Courthouse, put on by three of the Friday Night Fusiliers – Paul Crouch (3rd from left), Steve Sands (far left) and [a very young-looking!] myself (2nd from left).

A few years after this game, Paul moved to Australia and sold all the wonderful troops in these photos. However, I heard from him recently that he has decided to re-do this project, buying up and painting the troops all over again. He has set up the Sons of Liberty blog to follow his progress.

In talking with Paul, he told me he still has hardcopy photos of the original 2002 game. So I suggested he copy the photos so we could look back at what I think was one of the finest AWI wargames ever, even though it took place nearly nearly two decades ago!

The original Battle of Guilford Courthouse took place on 15 March 1781, between General Cornwallis’s 2,200 British troops and the 4,500 Americans under General Greene.

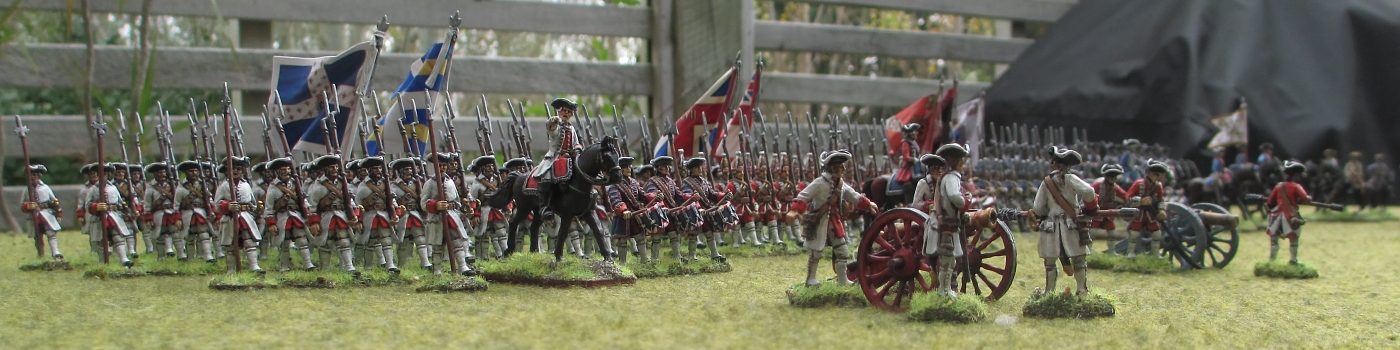
In the above photo, the British redcoats march out of camp on their way to do battle against the Americans. In the foreground are two cannons and some of their Hessian allies.

The figures and the scenery used in this game all belonged to Paul Crouch. In the main, the figures were by Front Rank, but there were also a few Dixons and Foundry figures.

Paul, Steve and myself were all firm “visual” wargamers, rather than “competitive” or “simulation” players. For us, the main thing was the game had to look good – to be a moving diorama, in effect.

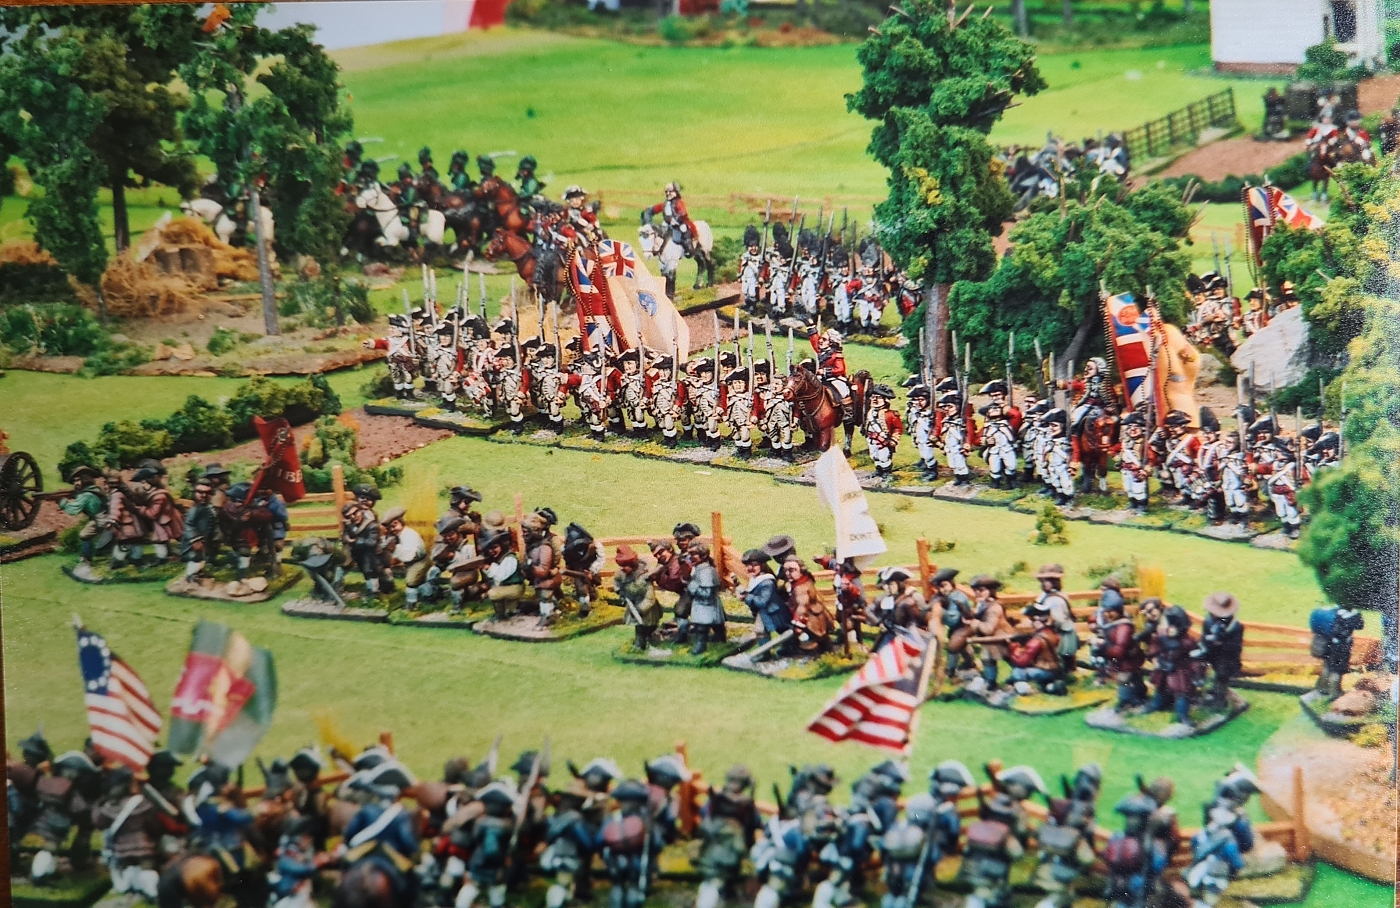
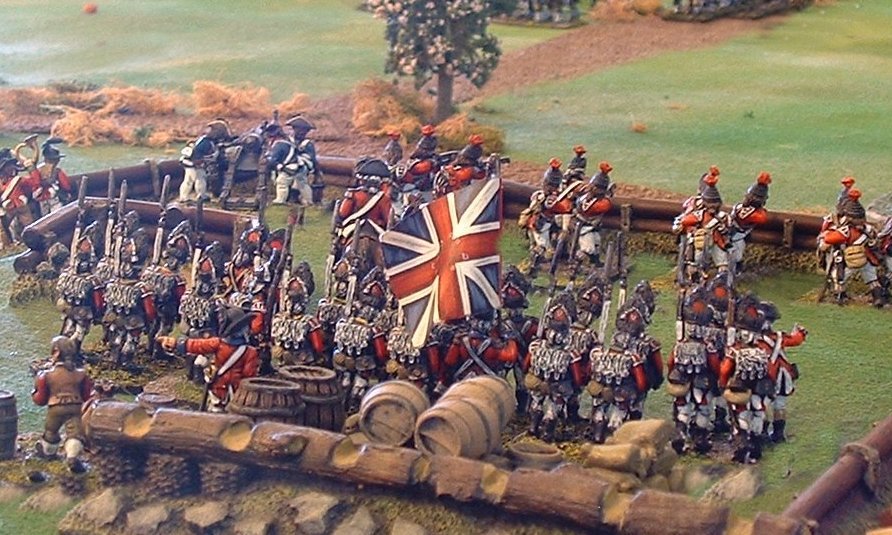
A closeup of the British advance. You can almost hear the drums beating and the fifes trilling The British Grenadier! Behind the redcoats is a battalion of Loyalists, wearing green coats and white trimmed hats.

The British flags were by GMB, who made the best flags around. Paul made the Loyalist flags himself. Note how the flags are realistically shaped – too often the effect of such beautiful flags is spoiled by having them standing out straight like boards.

On the left flank of the British advance are some British light troops, some German Jägers, and even a few Indians.

Paul’s bases were beautifully done – each base was like a mini-diorama. And his figure painting was absolutely exquisite. He used a black undercoat technique and acrylic paints.

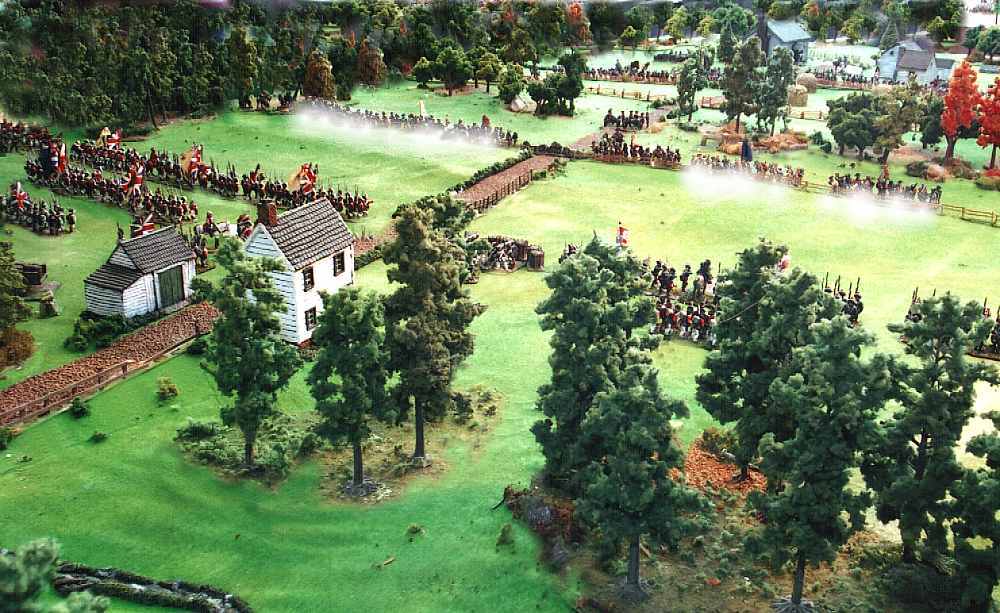
The British advance steadily across the clearing towards the first fence-line, where a line of Americans can be see waiting. Behind them, way off in the distance, are more troops in front of the Guilford Courthouse.

The base cloth we used really set off the figures well. It was green baize, but had been sprayed with a mixture of colours. Under the baize was an old carpet which had been laid over some pieces of wood, giving the effect of slightly undulating ground.

You can also see this same photo at the top of this posting, but retouched to make it look a little more real.

Nervous American militia await the redcoats behind a typical switchback railing fence.

These are not the steadiest of troops. But if they can get off a good volley or two before they run, they might slow the steady British advance.

Steve Sands was busy for several nights producing much of the fencing used in our battle.

One of the features that really made this game was the fact that all our battalions were big (at a time when 12-figure units were the popular standard). Each unit had at least six bases of around three or four figures each. Anything smaller does not look anywhere near as good.

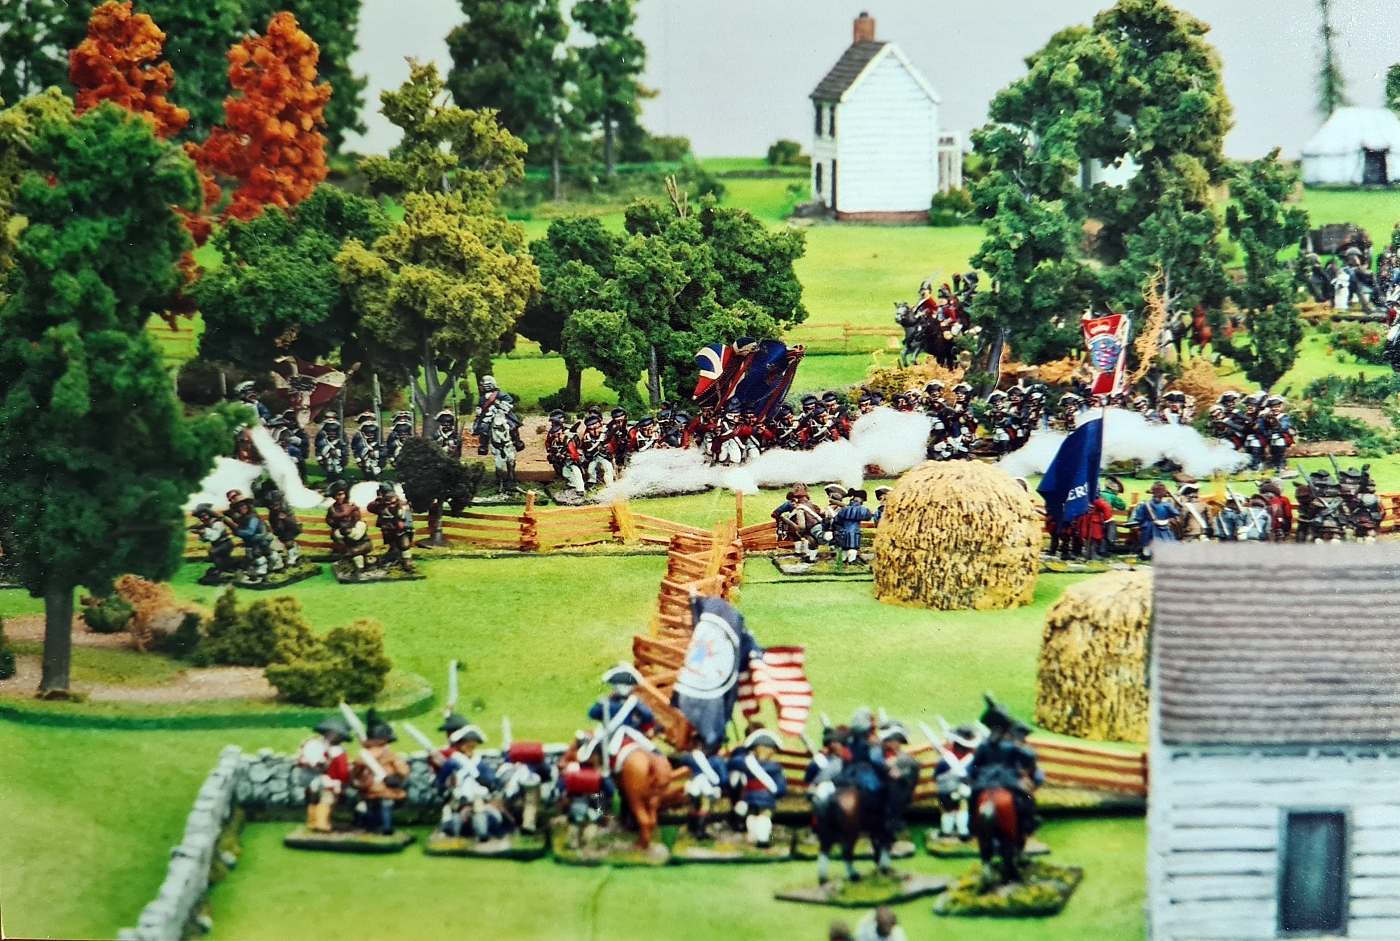
The British have forced back the militia through a line of trees. The militia stop, rally bravely, and try to hold the next fence-line. A British and Hessian volley rips through the air.

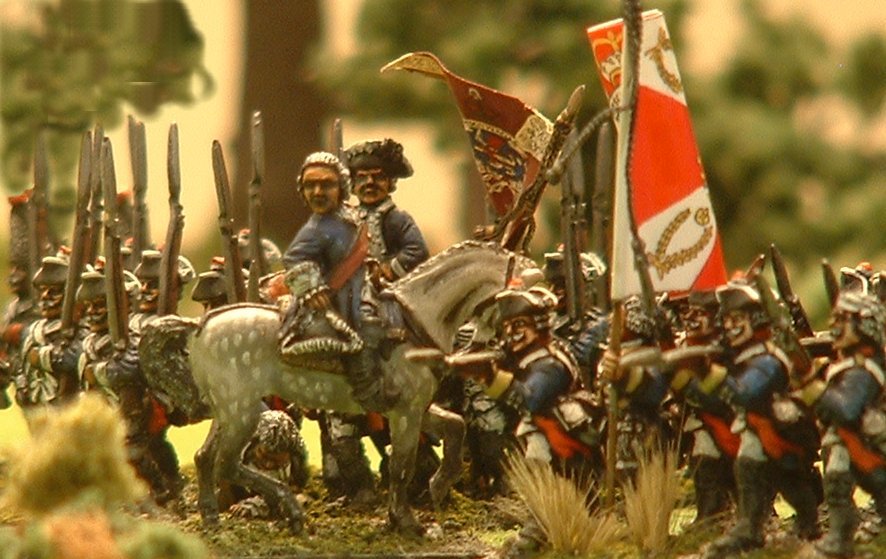
In the foregound is the last line of American defence. But these troops are no mere militia. These are the regular American infantry, the Continentals. They’re made of sterner stuff, and the British might be worn down by the sniping of the militia before they get to Continentals’ line.

A close-up of the British and Hessian volley. We were using a very simple set of rules called Gentleman Johnny’s War, which made calculating the effect of volleys such as this very easy.

You can never have enough trees in a demo game, especially one set in America. Paul had a huge amount of Woodland Scenics trees, which really looked good on the table.

For the sake of the simplicity, it was decided that trees only interrupted visibility, but didn’t hinder troop movements.

One of the British units charges towards the militia.

By sheer coincidence all the figures in this photo are posed perfectly, as if this was a set-up shot. The charging infantry are in a running pose, while those firing are pointing their muskets. Behind the fence, the militia take pot-shots.

No, the militia can’t stand yet another British volley, so they turn tail and they’re off. But, just as in the movie The Patriot, have they done enough to whittle down the British before they come to grips with the waiting Continentals in the foreground?

Our first sight of the magnificent Architectural Heritage model of the Guilford Courthouse itself. This is a miniature of the actual building. If you look very carefully, you’ll even see the judge standing in the doorway, no doubt encouraging the steady Continentals lined against the fences.

Paul always liked to dot his games with little bits of scenery such as the haystacks you can see in the picture. These were for visual appearance only, and didn’t effect play at all. They were simply moved out of the way when troops passed through.

From behind the Continental lines, you can see the last few militia, and way off in the distance a Hessian flag denotes the British advance.

During March in America, there wouldn’t really have been autumn (‘fall’) trees! But the occasional touch of autumn colours in the trees just gave a lift to the table appearance.

The white house in the far background was hand-made by Paul.

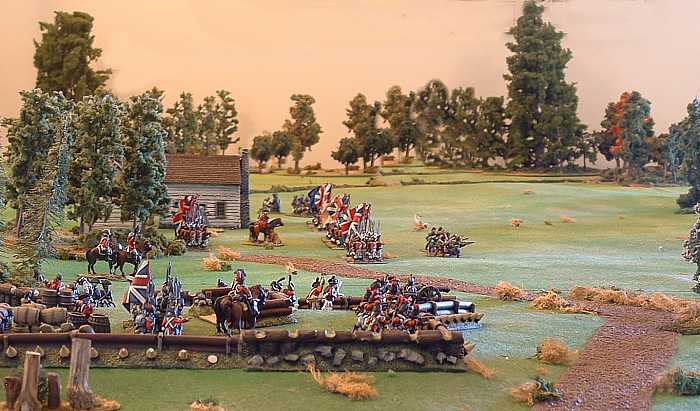
The judge looks on as the battle rages between the British and the Continentals. In the end, the British manage to puncture the Continental centre and creep round their left, so the Americans have to yield the field, just as happened in real life.

Note the barricade of barrels in the foreground – another nice scenic touch.

You would think that General Cornwallis must be feeling pretty pleased with himself. However, in real life the battle cost him 532 casualties against the Americans’ 260.

So instead of pursuing his defeated enemy, he retired to the coast. If this game had been part of a campaign, the result might have been pretty much the same.

There is more fun with scenics in the background – an ammunition dump and wagons to bring powder and balls up to the guns.

One of the most asked-about units in the game, but one which never really came into play, was Tarleton’s Legion. This was because the main protagonist in The Patriot was apparently modelled on Tarleton (though one cannot say that the film representation was at all accurate!).

In the real battle the cavalry did get to grips, but in the game the day was won before they even got onto the scene.

So, just as in real-life, a marginal British win. But more importantly for the Friday Night Fusiliers, a win for presenting the sheer beauty of hundreds of exquisitely painted figures marching and fighting across a gorgeously terrained board!

A special thanks to Wayne Stack, a fellow Fusilier, who took all these wonderful photos as part of an assignment for a police photographer’s course he was on at the time! He was enthusiastic when I told him that Paul still had his photos, and readily gave us permission to publish them here.

I hope you have enjoyed looking back at this spectacular game, and that you’ll follow Paul’s progress on his blog as he recreates his exquisite armies.

Un-painting the Renedra ramshackle house

The above scene could have come straight out of a western movie, with the gunfight taking place at a dilapidated old farmhouse on the prairie.

However this photo isn’t a movie still, but a shot of my latest project: building the Renedra kitset of a ramshackle house. This 1/56 scale plastic kit replicates a typical North American cabin or farmhouse. The style and construction means that can be used from 1750-1900 … and beyond.

The designers (the Perry twins, I wonder? They certainly did some of the other Renedra kits) have done a great job of representing a house that has been left to wrack and ruin, with the roof caving in, the porch falling to bits, and the weatherboards rotting away.

My aim in painting this model was to make it look un-painted and un-loved! The method I used to ‘un-paint’ this house was similar to how I did Renedra’s earlier ramshackle barn kit, seen on the left in this picture. There’s a detailed description of my un-painting method on this posting from 2013.

Here’s the rear view of the house. The kit comes with a number of accessories to dress it up (or dress it down, if you like!), such as the rickety ladder and broken cartwheel you can see in this picture.

Other than the planked floor, there is no interior detail on this kit. So I didn’t attempt to do any painting inside. However, I did make the roofs so that they can be removed if required.

Completing this house spurred me to photograph it with my collection of western figures, even though I only have five of them – my smallest gaming period! But I suspect my main use for this model will be for games set in the colonial New Zealand Wars.

The birth of the Barryat of Lyndonia

My first exposure to the hobby of wargaming was as a schoolboy back in the 1960s, when I stumbled across Brigadier Peter Young’s and Lt Colonel James Lawford’s book Charge! Or how to play wargames in my local library.

I still remember poring over the pictures in the book, totally fascinated by the 18th century era, the lifelike figures and even the stylised miniature trees.

But when I did start eventually playing wargames, it wasn’t in that wonderful 18th century period after all, because due to lack of finance and the poor availability of wargaming figures in New Zealand, my gaming was pretty much restricted to Airfix plastics and the occasional lead Minifigs figures.

The nearest I could get to these eighteenth century armies were the American War of Independence figures put our by Airfix. But they just didn’t quite capture the rococo style and flair of the uniforms of the European wars of the mid-century, that were so much part of the reason I loved the illustration in Young and Lawford’s book.  

It wasn’t till many years later that I discovered a range of relatively cheap 30mm plastic figures in the United Kingdom made by a company called Spencer-Smith. In fact, some of these very same figures featured in the illustrations in the book I so admired.

I don’t recall where I first heard about this range – possibly in an advertisement in Military Modelling magazine. But I soon sent away an order, and eventually received a padded paper envelope full of the brown soft plastic figures.

Some time round that period I made a trip to Europe, and was lucky enough to be able to fit in a visit to the Bavarian Army Museum in Ingolstadt. There I saw a huge diorama of the Battle of Leuthen, made up of thousands of flat figures.

Amongst all the white-coated Austrians in the diorama, my eye was caught by the light blue lozenged flags of the Bavarians. This, along with the fact that my uncle was Bavarian, was enough to decide me to paint up my Spencer-Smith figures as a Bavarian Electoral Army.

I still have them, but after nearly half a century the plastic has become very brittle, so they never see the gaming table anymore.

I wonder if this brittleness might have anything to do with temperature variations, as I painted some of these troops whilst working in Antarctica for a season (making them surely the southern-most wargames army in the world).

My next splurge into the period was after seeing my friend Paul Crouch’s American War of Independence armies. Seeing his wonderfully painted figures drew me back into the hobby after a 20-year pause for family and work commitments. 

I was so entranced with their somewhat exaggerated chunky style, which I felt had more ‘presence’ than the slimmer plastic ranges I had been used to up till then.

So I immediately started building an army myself, this time going for 18th century French for no other reason than that they seemed to have the most colourful range of uniforms.

My 18th century French army grew, and I was very proud of it. But much as I loved my figures, there was always just something about them that didn’t quite capture the memory of Charge! Or how to play wargames.

I eventually realised it was a very simple thing – I couldn’t really see the breeches!  Nothing kinky there … it’s just that I think coloured breeches are what set the uniforms of the mid-18th century apart from the later part of the century.  But with the ‘chunky’ sculpting style of the figures I had been buying, the coloured breeches were hard to see.

Don’t get me wrong, I still love the ‘chunky’ style, and my French remain one of my favourite armies. It is just that they didn’t match my childhood memories of this particular book.

Then a few years ago I finally found my nirvana of 18th century figures – Minden Miniatures.  Here at last was a range of exquisitely sculpted slender figures.  And you could see the breeches!

When I first saw pictures of these figures on a website, the years just rolled back and I felt as though I was once more poring over those illustrations in Charge! 

So I decided to start painting a brand new eighteenth century project – but whatever army was I going to collect? French again? British? Prussian?

Besides Charge! Or how to play wargames there was another reason for my love for the 18th century. It was a 1975 period drama film by Stanley Kubrick, based on an 1844 novel by William Makepeace Thackeray.

When I first saw Barry Lyndon at the cinema, I was enchanted. Inspired by painters such as Thomas Gainsborough and William Hogarth, the film had a beautiful, painterly look that transported me right into the 18th century.

Barry Lyndon tells the story of a fictional 18th century Irish rogue and opportunist who marries a rich widow to climb the social ladder and assume her late husband’s aristocratic position, before it all eventually unravels and he ends up back where he started. During the story he joins the British army, and later the Prussians, and fights the French.

When I first saw the Minden Miniatures figures, they not only reminded me of Charge! Or how to play wargames, but also of the military scenes in Barry Lyndon. Wouldn’t it be great, I thought, to recreate one of the regiments from the movie. But, again, for which army?

Then it came to me why not make up a completely imaginary country (known in wargaming as an ‘imagi-nation’) that hires units from any European country it desires? This way I could reproduce all the regiments from the movie – British, Prussian and French – and combine them into one army!   

And so a new state was born: the Barrayat of Lyndonia. Whilst this might sound a weird name for a country, it’s no worse than the real-life Banat of Temesvár, part of the Austro-Hungarian empire!

Go to Part 2 of this series on the army of the Barryat of Lyndonia, based in part on an article originally published in Wargames Illustrated #385.

I’m going to try out paper soldiers

IMG_1254

I’ve decided to try something different – paper armies! For the last couple of years I’ve been keeping my eye on the rapidly growing range of books that Peter Dennis has been pumping out, each one covering a different campaign using 2D paper soldiers and scenery.

After having enjoyed so much making some Dutch houses out of cardboard, I finally decided to give these paper figures a go. So I ordered two books to try out, covering a couple of periods I’ve always fancied, but couldn’t face starting to collect and paint from scratch: the Jacobite ’45 Rebellion, and the American Revolution.

IMG_1255

Actually, this isn’t the first time I’ve played with paper soldiers. Many, many years ago (er, many decades ago), my then-flatmate Alan Hollows drew and cut out two Seven Years War paper armies, using a whimsical style reminiscent of Asterix the Gaul. I wonder if any New Zealand readers still have photos of these wonderful home-made figures?

Anyway, back to the Peter Dennis books.  On receiving my package in the post today, I was very pleasantly surprised to see the books were choc-a-bloc with not only every type of figure you would need for both sides, but also flags, artillery, carts, casualties, markers, appropriate buildings and trees, and even two sets of wargames rules (beginner and advanced versions). Wow!

IMG_1259

You can see the quality of the artwork from the illustrations I’ve reproduced here. The fronts and backs are carefully designed to line up.

IMG_1264

Peter has developed an innovative concertina folding system that enables you to  produce stands with multiple ranks of figures. Have a look at this video of how to assemble these figures:

But please don’t try assembling the sample images from my blog – my camerawork will have put them out of alignment … and, anyway, you should buy the book!

I’m told the finished figures are very sturdy, despite being made out of paper. You can literally throw them into a box after a game, give it a good shake, and they’ll still come out good as new next time you play!

IMG_1257

Apparently the 2D effect works well in wargames, as the players generally stand on each side of the table anyway. I’ll be intrigued to see how this works in real-life – but the photos in the book are very promising.

IMG_1261

Anyway, I’m going to enjoy trying to build my first army over the next few days. But even if I were never to cut the figures out, these books are simply beautiful to look at in themselves!

IMG_1262

I’m also really excited that later this year Peter will be publishing a book for the War of the Spanish Succession – another colourful period I’ve always fancied, but couldn’t face starting.

9781912390922

He’s also coming out with a book of (3D) buildings for eighteenth-century Europe. I’ve pre-ordered both books already!

9781912390939

Revisiting a spectacular Battle of Saratoga game

Capture

Some of the games I’ve played over the years really stand out in my memory. From time to time I’ll feature these old games here on my blog.  

This particular game stood out because of the amazing terrain and figures.  To my eye, this was a convention-grade game, but played in a garage! I never recorded the date this game as played, but it would be a good decade or two ago now.

This game impressed me so much at the time that I even put together a website about it, from which I’ve copied the following text and pictures.  Much to my surprise, the site still exists – thought my amateur hand-coded HTML doesn’t seem to have preserved the formatting too well.

ff_before_the_storm_700
Before the storm.

The year is 1777 – General “Gentleman Johnny” Burgoyne’s expedition to cut off New England from the rest of the rebellious American states has reached the clearing of Freeman’s Farm. The lines of redcoats form up around the farmstead, whilst a redoubt has been rapidly thrown up on their right. They steadfastly await the Americans advancing from out of the woods in front of them.

Myself and two other New Zealand wargamers, Paul Crouch and Steve Sands, had recently bought a copy of the British Grenadier rules, and we were determined to try them out. One Sunday afternoon the three of us finally managed to get some time off together, and this is the game that ensued.

ff_brtish_line
British lines around Freeman’s Farm.

This closer view of British redcoats from General James Inglis Hamilton’s brigade around the farmstead shows some of the amazingly detailed 28mm miniature soldiers and terrain owned by Paul.

ff_redoubt
British redoubt.

The scenario rules for this battle state that the troops of Brigadier-General Simon Fraser’s brigade can only leave the confines of their redoubt on the British right after a throw of double sixes. “I never get double sixes,” says Steve, throwing the very first dice of the game – you guessed it, double six!

So Fraser’s light infantry and an artillery piece emerge from the redoubt in the first move of the game, throwing the American plan into disarray before they even start moving.

ff_column_from_woods
Poor’s columns advance down the road towards the waiting British.

On the American side, Roly commands General Enoch Poor’s brigade of infantry and artillery. The scenario calls for them to enter by a road on the left of the American position. But instead of heading diagonally towards the British (visible in the distance in this photo), the threat of Fraser’s troops making their sortie out of the redoubt means that the Americans have to change their orders to make a right turn and form their lines more to the centre.

ff_american_lines
The American advance in the centre.

Poor’s brigade has now been joined by that of General Ebenezer Learned, played by Paul. Meanwhile, General Benedict Arnold and his aide can be seen in this photo, directing the commencement of the assault on the British line. Unfortunately, another double six means that Arnold is lightly wounded, and so has to temporarily leave the table.

You can also see the amazingly realistic ground-cloth that Paul inherited from the late Jim Shaw. Thrown over a piece of carpet underlay, which in turn is draped over strategically placed objects, it gives a realistic rolling ground effect.

advance the colors
The British line awaits the onslaught.

After moving their line back slightly to form a better defensive position around the farm, the British lines stolidly await the American attack, with some loyalists skirmishing to their front. The redcoats’ objective in this scenario is to hold the farm position.

All the figures used in this game belonged to Paul. They included castings from Front Rank, Foundry and Perry Miniatures. The exquisite flags were mainly by GMB Design.

new_american_centre
The lines close.

Slowly, inexorably, the American lines advance towards the British. Because of the extended maneuvering that Poor’s brigade has had to do to avoid Fraser’s light infantry and artillery, it takes quite a while to reach this stage of the game, so we “fast-forward” at this point by doubling a few moves to bring the troops into action.

Movement distances in British Grenadier are randomised, and generally must be taken the full amount. This makes coordinating an attack quite difficult, but true to the period.

ff_charging
Charge!

Finally the first regiments of the assault charge forward.

The mounted officer in the background is not just for show. These rules have an innovative system where units earn ‘disruption points’ from movement, firing and melee. The more such points, the harder it is to do anything. Generals can help units shake off these points, but only one unit per move, so they have to pick and choose. Thus mounted officers realistically gallop to and fro all over the battlefield.

ff_pressing_home_attack
The second American line in support.

American troops in hunting shirts form the second line.

Under these rules, an attack needs to be well supported, as the disruption points can cause havoc to the first line. On the other hand, you don’t want the second line too close, as they have to move their full distance, so can actually collide with the rear of the first line, causing even more disruption!

ff_hold_the_line_600
The British line holds.

The American regiment on the far left has defeated a British battalion and forced it back. But the British battalion on the right holds out valiantly, whilst General Burgoyne dashes up to bolster its defence. Here yet another double six is thrown, but Burgoyne survives and it is his ADC who is killed.

In the foreground are Colonel Daniel Morgan’s riflemen and light infantry, who have been in front needling the British lines all during the big American assault. Now they can pull back out of the way to let the line infantry do their job.

ff_hessians
The Hessians arrive.

The Americans have only succeeded in pushing back one British unit, when to their right they hear the beating of drums as Baron von Riedesel’s Hessians arrive on the battlefield, thus extinguishing any hope of the Americans forcing the British out of the Freeman’s Farm position.

So in our game the British win. This would possibly have had a major effect had this happened in the real battle. It was the British surrender at Saratoga that finally induced the French to take part in the American War of Independence. In our game, this might not have happened ….!

ff_battle_words_700

Map of the battlefield.

This overview of the battle shows how the game progressed. You can see where Fraser’s men issued out of the redoubt at the very start of the game, and how they forced Poor’s brigade to make some complicated manouevres instead of directly attacking Hamilton’s position. Meanwhile, the British backstepped to form a better defensive line closer to the farm, and then the subsequent huge American assault on the centre took place. Right at the end of the battle, the Hessians arrived on the British left to cement their victory.

ff_the_originals

The players – Paul Crouch (Generals Learned and Arnold), Roly Hermans (General Poor) and Steve Sands (British/Hessian), all members of the [then] Kapiti Fusiliers Historic Gaming Club in Paraparaumu, New Zealand.

ff_rylan2

Paul’s son Rylan enjoyed the game too!


Kapiti Fusiliers: ‘Effective Use of Basecloths for Terrain’

banner_fusiliers

The following article on terrain cloths first appeared in 2005 on the site I used to maintain for the Kapiti Fusiliers Historic Gaming Club, our very loosely-formed gaming group.

That website (and the ‘club’ itself) has now long gone, but I do still have it on my hard drive. So I intend to occasionally re-post some of the more popular articles here on my blog.

This particular article on terrain cloths was often the subject of links from discussions on various wargaming forums, so obviously grabbed the interest of gamers.  So, here it is again, eight years later.  Enjoy!

Effective Use of Basecloths for Terrain

by Fusiliers Roly Hermans and Mark Strachan

16_freemans_2

When you look at a display game, what is the first thing that you see? Is it the beautifully painted figures? Their colourful flags? The realistically flocked bases? The exquisite buildings and trees? No, most likely the first thing that hits your eye is the “ground” itself – after all, it is by far the part of the game that has the biggest surface area to catch your attention.

If the first impression of the ground is a good one, then you start homing in on the details, such as the figures and terrain. But how often have you seen games marred by poor ground effects: a garishly coloured cloth, for instance, ill-fitting terrain squares, or maybe unrealistic stepped hills?

But making a realistic ground effect needn’t be an expensive or complicated business. Paul Crouch, a member of the Kapiti Fusiliers, has put on several demonstration games in the past which have caused a lot of complimentary comments for their realism, but which use an incredibly simple system to attain those magic effects.

16_table_2_large

Here’s how he does it.

Firstly, Paul arranges a few objects around the table which establish where he wants the ground to rise. Nothing too difficult here – anyone who has ever used a basecloth for a game (which is most of us!) will be familiar with this step.

Now comes the magic part. Before draping the table and objects with the basecloth, Paul first covers it with a large piece of carpet underfelt. This is a very heavy pressed fibre material, that in the carpet industry has now been mainly replaced by waffle rubber and recycled polyurethane foam chip underlays. But you want the old-fashioned thick underfelt without a rubberized backing, which looks like it is made of pressed wool fibres.

16_felt_1

When this is draped over the objects, its heavy weight means it conforms to the objects underneath without creasing, making nicely-shaped gentle slopes which will carry model soldiers without sagging.

16_felt_2

The basecloth is now draped straight over the underfelt. In Paul’s case, this is a very old baize cloth (in fact, it was a bequest to him from an old wargaming friend who had it for many years himself before passing away). The baize in question is called “card table baize”, a much lighter material than billiard table baize (much lighter in cost too). Baize, by the way, is the name of an often bright-green cotton or woollen material napped to imitate felt and used chiefly as a cover for pool, billiards and card tables.

The secret here is what has been done to the original colour of the cloth.. Paul’s cloth has received many light coats of various coloured spray-paints, such as light greens, tans, and even very yellowy-greens. This gives it a patchy mottled look, rather than a single hue.

There is particular skill to spraying the cloth, otherwise it can become blotchy and look like a rather poor camouflage paint scheme. The art is to spray from a good distance away (300-500mm) so that you achieve a feathered edge. Start with a mid-brown first, then a forest green, followed by a bright green and finally with bright yellow as a highlight. The final effect is impressive and even more so when used in conjunction with the carpet underfelt that softens the contours and prevents the baize from moving.

16_freemans

The overall effect is a lot lighter and more vivid a green than one would expect. But when you see aerial photographs, you’ll note that grass is a much lighter green than the dark pool-table cloths we see so many wargamers use. Here’s a photo of the Kapiti Coast in New Zealand, home of the Kapiti Fusiliers, for instance – look at the colour of the grass.

16_kapiti

A final touch is to add some more texture to the cloth by lightly sprinkling some old flock and small pieces of lichen around the table. In fact, these need not be collected at the end of the game – just fold them carefully into the cloth, and they’ll be mixed up even more for the next game.

Now your table is ready for the addition of scenery items (another hint: don’t skimp on the trees – the bigger your trees, the better the scenery will look), buildings, and troops.

The disadvantages of this system are that you cannot recreate really rugged scenery this way; roads and rivers are merely placed on the table rather than carved in; and delineation of where a hill’s slopes start and stop is not definite.

But, notwithstanding those slight disadvantages, the good points of this system are: it is quick and easy (once you have spray-painted the cloth); very flexible; holds miniature soldiers well; realistic for creating rolling country; and – best of all – is guaranteed to make your game-play more enjoyable as you feast your eyes on that fantastic-looking landscape!

To see more photos of Paul’s terrain in action, visit these three gallery websites:

Saratoga – the Battle of Freeman’s Farm

Battle of Guilford Courthouse

Last of the Mohicans

Famous Kapiti Fusiliers armies for sale

Several years ago the Kapiti Fusiliers hosted a beautiful 28mm Guilford Courthouse game at Call to Arms in Wellington, New Zealand. The resulting website of photos was viewed around the world, and produced a great deal of favourable comment:

http://homepages.paradise.net.nz/skarlet/guilford.html

Both armies in this game are now reluctantly being offered for sale by the owner, Paul Crouch, now living in Queensland, Australia.  He would prefer to sell them as a bulk lot, so please let me know if you would like to know more (list, price etc):  roly_hermans AT hotmail.com

This is your chance to buy a couple of absolutely exquisite and renowned 28mm AWI armies.

Click on the image below to see an impressive shot of that famous Guilford Courthouse game:

By the way, the same figures also featured in this Saratoga game (lots more juicy photos here!):

http://homepages.paradise.net.nz/skarlet/freemans.htm


Revolutionary reading

While I don’t have any armies from the American War of Independence (or American Revolution, if you will) in my collection, it is a period I have always found very colourful and fascinating.  It was seeing Fusilier Paul Crouch’s wonderful AWI armies that got me back into the hobby about a decade ago.  I was also fortunate enough to take part on a couple of iconic AWI games here in Wellington a few years ago – the battles of Guilford Courthouse and Saratoga/Freemans Farm (click on the links – they’re worth it, I promise!).  These beautifully presented battlegames, again using Fusilier Paul’s marvellous figures, are still talked about in almost hushed terms here in New Zealand! 

So whenever I’m in a secondhand bookshop, American history is one of the shelves I always browse in.  And recently I’ve come up trumps … twice. 

I’m a very visual person, so books of dense historical writing just don’t do it or me.  I want beautiful, inspiring pictures and a lively text.  So I was very excited when I found an old out-of-print AWI book that I had never heard of before, choc-a-bloc full of illustrations.  I nearly missed it too, as it had lost its dustcover and was sitting forlorn and lost amongst its much brighter-covered companions!   

Book cover
Cover of 'The Revolutionary War' by Bart McDowell, published by the National Geographic Society in 1967. I suppose the original had a dust jacket, but my second-hand copy unfortunately didn't.

The Revolutionary War by Bart McDowell was published way back in 1967, even before the bicentennial.   It is a National Geographic publication, so the style will be quite familiar, with the use of many full-colour pictures to illustrate the engaging text.  

McDowell’s chronological history has an interesting slant, as interspersed through the text are descriptions of  taking his family to all the places described in the story.  He uses first person language  for what his children say, giving the opportunity for some intriguing questions and comments that normally wouldn’t come out of the mouths of adults.  His wife and children were apparently very happy to be immersed in the history of the war – one wonders if they are still AWI buffs now, over 40 years later?! 

Written in 1967, the book is a little (did I say a little?) jingoistic.  But that makes it all the more entertaining, as it authentically reflects the views of that time.  So far as accuracy goes, it will of course be very dated and won’t reflect modern findings (for example, was Colonel Banastre Tarleton as bad as he was painted to be?). 

As mentioned, the book is lavishly illustrated.  Take this wonderful painting of the ‘Battle Road’, the march of the British back to Boston after the first shots of the war at Lexington (click picture to enlarge).  The small picture on the right is the author’s small son between two rocks that were really used as cover during this battle. 

Lexington 

Best of all, though, are the several birds-eye views of battles of the AWI.  I’ve seen paintings like this of the American Civil War (in fact, famous computer game designer Sid Meier was inspired to develop his Sid Meier’s Gettysburg by his memories of examining such pictures as a child).  But this is the first time I’ve seen such paintings for the AWI.  I can pore over them for hours.  They just cry out to be turned into demonstration wargames!  Here is Bunker Hill, for instance (click picture to enlarge): 

Battle of Bunker Hill 

And here is the wintery scene at Trenton, where a Hessian force was surprised and defeated (click picture to enlarge): 

Battle of Trenton 

The Revolutionary War, of course, is no longer available from normal bookshops.  However, at the time of writing, I have seen it listed in several places on the internet for only a few dollars.   If you’re an AWI fan, google it and get it … you won’t be disappointed! 

The other book I stumbled across is also filled with lavish illustrations.  Marines in the Revolution by Charles R Smith, as the title implies, describes the history of the US Marines (and their antecedents) during the American War of Independence.  This is a massive hardcover book (no dust cover again, but this time a painting is printed on the cover). 

Book cover
Front cover of 'Marines in the Revolution' by Charles R Smith, published by History and Museums Division, Headquarters US Marine Corps, 1975.

The text is a lot more detailed than the previous book I reviewed.  It covers pretty well every action, large and small, that the marines were involved in, both at sea and on land.  The wargaming potential, of course, is huge, especially for skirmish games. 

Dotted through the text are about a dozen two-page spread paintings.  I’ve illustrated several of them here to give you an idea, but the small size of my pictures just doesn’t do justice to the majesty and scope of these paintings.  Here, for example, are John Paul Jones’ men embarking onto small boats to raid Whitehaven on 22 April 1778 (click picture to enlarge):  

Embarking onto a boat. 

This painting shows John Paul Jones’ marines being reviewed at L’Orient by John Adams on 13 May 1779.  The marines on the Bonhomme Richard were a contingent from the French Regiment de Walsh, a red-coated former Irish regiment in the French service (click picture to enlarge). 

Inspection  

Finally, here is an unusual view of the fighting top on the Continental frigate Alliance during its battle with the sloops-of-war Atlanta and Trepassy on 29 May 1781 (click picture to enlarge).  Dramatic stuff! 

Fighting top. 

Again, look out for this book on Google.