

Often you come across wargames-related products you like. Sometimes you come across one you really like. But very occasionally you find one you really, really like. And that’s what I’ve just found.
The product in question came from a somewhat unexpected quarter for me. Up till now I’ve been rather dubious of laser-cut wooden model buildings. I’d never seen any in real-life, but pictures on the internet seemed to indicate that they were often rather toy-like because of the visible joints and the limits in three-dimensional surface detail.

Then late last year I saw the above picture of 4Ground’s new Japanese shogunate-era houses. From what I could see, they appeared to have very few visible joints, and the surface-detail looked OK (helped by the typical frame design of the Japanese cottage). So I decided to give them a go, and ordered a set of two Shogunate houses.
Two days ago my order arrived in the mail in a surprisingly heavy box. Inside I found two plastic bags jam-packed with pieces of wood of different thicknesses and colours, all filled with pre-cut shapes to press out. There were also some pieces of teddy-bear fur and an instruction sheet with step-by-step photographs in full colour. I could immediately see I was looking at a quality product.
I couldn’t wait to get started, so that evening I began assembling the first house, thinking I would be able to complete the first few construction steps. But much to my surprise, I had completely finished the model by bed-time, apart from the last step of shaping the teddy-bear fur thatch.
I was impressed at how cleverly the (un-named) designer had planned the pieces. Everything looks so intricate, but with the many hidden lugs and interlocking cutouts, it all goes together in an elegant manner. I kept on whistling to myself in appreciation as I came across one cunningly designed feature after another.
The model starts with assembling a frame, just like building a house in real-life. The pieces of the frame interlock so snugly and tightly that you could almost skip the glue. You then insert inner walls and a half-platform floor, along with opening doors (both hinged doors and traditional Japanese sliding doors) and very intricately latticed windows.

The next step is to glue pre-coloured exterior panels into the gaps between the framework. Finally you make the roof, which is a separate sub-assembly that fits over four lugs on top of the walls, making it removable for game-play.

As I went through the process of building the model, I was struck by how every part, no matter how small or fiddly, fitted so accurately. There wasn’t the slightest error in the laser-cutting, so no need for any trimming or forcing parts together. As a result, I found construction of this model one of the most enjoyable kit-building experiences I’ve ever had.
Not only was the house fully assembled in one evening, it was also completely ‘painted’ because of the different coloured wooden pieces. The model was almost ready for play only a few hours after first opening the bag!
I’d make just one cautionary remark: ensure you study and follow the instructions carefully. The lug arrangement means that every piece has to go exactly where it is designed to go. I initially attached one frame on the wrong side of the base, but fortunately realised my mistake before the glue had set!
The only step that needed to wait another day was the final shaping of the thatch. This is because after you glue the teddy-bear fur onto the wooden roof, you need to wait 24 hours for it to completely dry before damping it down with diluted PVA glue and brushing it into shape. The instructions show this being done with an old toothbrush, but I used a plastic comb. After combing the fur downwards, I pressed the comb into the thatch to make several horizontal lines to indicate layers.

Of course, clever assembly design or not, the real test is how good the finished models look. In this case I have no qualms about saying these would have to be two of the nicest models I’ve ever come across. They look exactly how I imagine Japanese houses to be. And they go perfectly with my 28mm Kingsford Miniatures samurai figures, as can be seen in the picture above.
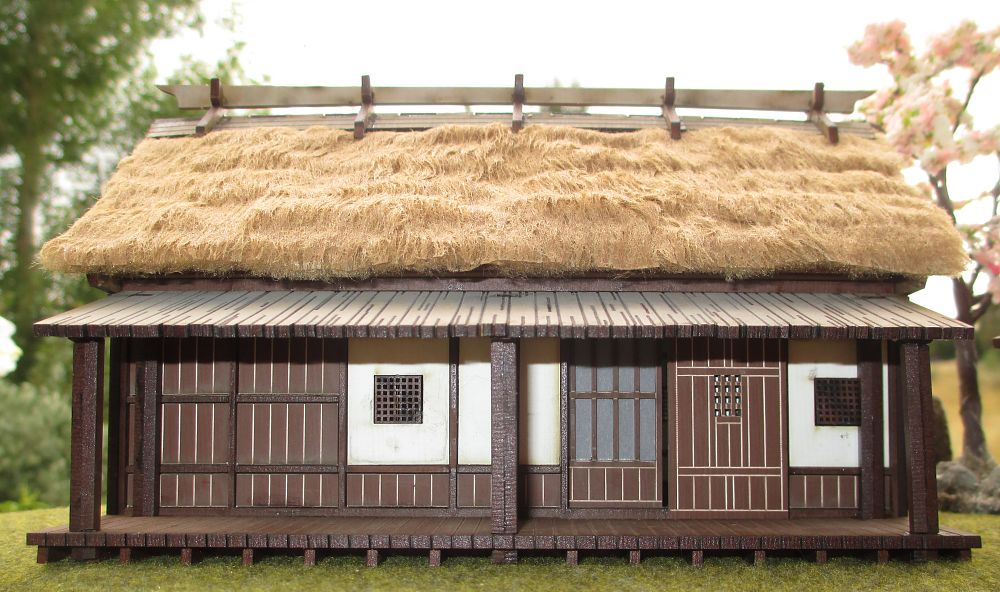
According to 4Ground’s website, the larger house is ‘a lowland home to a honbyakushō (literally – first farmer) family’. It has ‘ two hi-enengawa (full length verandas), one each side, both with naga-ita (wood planking) roofing. The cottage itself has a buki (thatched) kirizuma roof, and the mune-jimai (ridge cover) is the relatively common oki-chi.’

The other house is a smaller ‘home to a komae family of smallholders. This lowland minka (vernacular built) dwelling is made from kyoro-gumi wooden post-framing, with both partial plastered bamboo panels and timber boarded panels’.
These two 4Ground houses have completely blown away my preconceptions about laser-cut models. The joints are cleverly disguised in all but one area (the ridge cover of the roof, but a small splash of paint should cover that). And the surface detail is exquisite.
If there is ever a competition for the best wargames terrain product for 2013, I’d say 4Ground’s shogunate-era houses would have to be amongst the top contenders.
Finally, there’s another rather novel bonus to these models: the laser-cutting process results in a not unpleasant aroma rather like smoked meat!

These do look very good. I e some other laser cut buildings and none look as fine.
I’ve never seen any other laser cut models to compare the 4Ground ones with, Phyllion – but I love these ones, as you can see.
These look fantastic. I am really happy I subscribed to your blog. Posts are always intresting.
Thanks for that, Carlos13th. I’m pleased you find the posts of interest.
Thanks for the details on building these 2 buildings. They do look quite amazing.
Great review and excellent job Roly -they look the bees knees!
if you enjoyed doing that thatch I’ll have to set you a task making me some more Rohan houses ! 😉
I’m sure we could have a little Rohan-house-production workshop, Scott! The thatch was dead easy to do.
Great review. How did you make the cherry blossom tree
Hi Yoritomo. Here’s a post on my blog about the cherry blossom trees:
https://arteis.wordpress.com/2013/08/25/cherry-blossoms-for-my-samurai/
yup they sure are excellent, the designers names are BEN and ADAM, father and son, they compete to see who can make the most detailed model!
I know this because I paint the figures they use in their displays!
http://byjoveproductions.blogspot.co.uk/
Thanks, Ross. They are certainly talented guys. I found a little biography of one of them, and it appears he had done work for museums, before making the link-up with 4Ground. So a very professional modeller..
Those houses look wonderful. Mildly off-topic, it’s amazing how tech has fed through this way into wargaming – and model making in general – as in, it’s economic to laser-cut wood and so forth. Unheard of even a decade ago. I remember, wa-a-a-a-y back in the ’80s, when some of the Wgtn IPMS guys were trying to figure out ways of injection-moulding various obscure aircraft in runs of less than about 100, without having the tooling costs turn the economics of it pear-shaped. They never managed it. But these days with 3D printing I guess it’d be almost trivial to make a one-off, providing you had the CAD files set up for the purpose. I guess that’s where plastic kits will be going.
Technology keeps changing the whole game. What could only be done by expert modellers in the past is now possible from anyone. Who knows where models will go in the future.
That is, assuming there’ll still be a place for model-making in the future. Though I suspect there will be, because there is some innate satisfaction that a certain part of mankind gets from seeing or making miniatures of what they see around them.
It is actually kind of an odd thing to do, when you think about it, miniaturising objects.. So possibly best not to think about it!!!!
Indeed. I must admit, time has been my enemy of late when it comes to modelling – I used to do quite a bit of it but have been reduced lately to merely buying the occasional pre-made WWII AFV…
Wonderful looking buildings! Great write-up and very useful! I like the samurai figures too!
David
Ah yes, of course … wonderful figures by none other than Kingsford! I should’ve mentioned that in the article, though. I’ll add it in now.
Great to see how well these have turned out, and the teddy-bear thatch tops it off beautifully (although I suspect you are probably being a little too modest about your modelling skills on this project).
As you say, the laser-cut approach seems to lend itself perfectly for this style of building – in fact anything else would possibly run the risk of appearing too bulky by comparison.
No, my modelling skills for this project were minor. For the roof, it was simply:
1. Glue the supplied pre-cut teddy bear fur onto the roof..
2. Let the roof dry 24 hours.
3. Coat the fur liberally with 50/50 water/PVA glue mixture.
4. Comb the fur straight down with a plastic hair comb.
5. Dig comb into the the fur at regular intervals to make lines.
6. Let dry for another 24 hours.
7. Trim the edges if desired.
Done!
Just ordered the bundle of 4 buildings and fences on the strength of this review – planning to use them with Ronin. Thanks for the photos/explanations, as I had wondered how the thatching worked!